Optimizing spotlight intersection in tiled/clustered light culling
I’ve been implementing both tiled and clustered light culling with forward rendering recently and one of the things I never was quite happy with is the way spot lights were tested against the frustum voxel/AABBs. I wanted to write up something about my entire culling implementation but then I got a bit sidetracked by looking into way to improve cone culling specifically and I thought the spot light testing is an interesting case on its own.
To give a very brief summary of what light culling actually is:
Light culling is an optimization method to reduce the amount of lights that are considered when shading individual pixels by placing lights in either a 2D (tiled) or 3D (clustered) grid based on their position, dimensions and possibly other parameters. Before the shading pass, a compute shader splits up the view frustum in buckets and loops over all the lights and places them in the buckets that it intersects with. Later during shading, using the pixel position, the appropriate light bucket can be calculated and only the lights in that bucket need to be considered for that pixel. The technique can also be leveraged to accelerate other things like decals, environment probes, … This greatly improves shading of a scene with a lot of dynamic lights. It’s a very common technique used in many games and engines.
Spot light culling can be challenging to find a good intersection method for. There are several different approaches to this and depending on how far you think this through, there are some significant optimizations to be made here compared to naive methods.
I’ve gained lots of insight from other articles which really helped me learn about all the methods. One of which is the amazing article of Bartłomiej Wroński and I really recommend checking it out if you want some more in-depth information about this. The others are mentioned below in case you want to learn more about the subject.
I’ve created a few interactive visualisations so you can see how a cone interacts with the frustum grid using different culling methods. This is obviously just in 2D, but it applies to 3D in pretty much the exact same way. You can click the button to unlock the light position and move your mouse around to move the light and click again to lock it in place so you can alter the spotlight parameters. Enable the debug view to see the intersection primitives used for the method.
I believe having these kinds of visualizations are super helpful when thinking about these things as usually these things are very hard to debug especially in shaders. Hopefully it will provide some extra insight in how it works.
First things first
So, what are we after here? We need to find an accurate and efficient method to see if a spot light falls inside a tile or cluster. Both in tiled and in clustered light culling, the buckets are represented as frustums with a near and far plane. That makes 6 planes (left, right, top, bottom, near and far) in total. In the case of clustered light culling, the near and far plane are defined by a logarithmic function while in tiled lighting, the frustums are created from the min and max depth of all pixels in that tile.
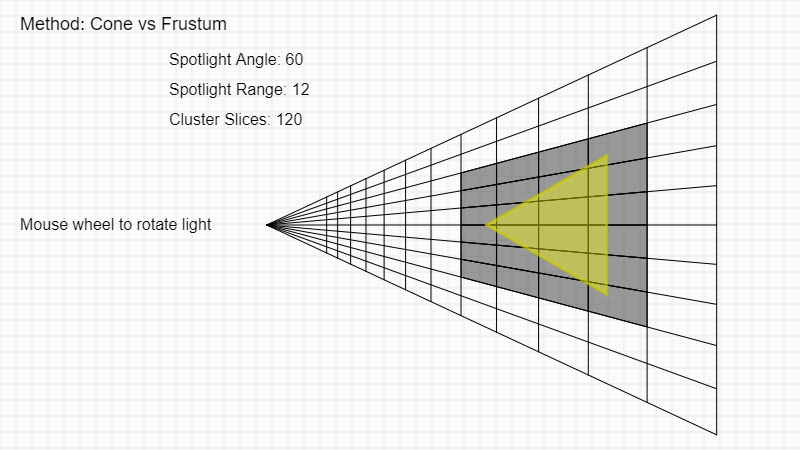
Cone vs Frustum
The initial thought is to use the frustum as the primitive to test the cone against. For a spot light, test that both the origin and the further point of the cone is behind each frustum plane. In a clustered lighting scenario, this gives the following result.
(visualizer replaced by image because screen is too small)
bool PointBehindPlane(float3 p, Plane plane)
{
    return dot(plane.Normal, p) - plane.DistanceToOrigin < 0;
}

bool ConeBehindPlane(Cone cone, Plane plane)
{
    float3 furthestPointDirection = cross(cross(plane.Normal, cone.Direction), cone.Direction);
    float3 furthestPointOnCircle = cone.Tip + cone.Direction * cone.Height - furthestPointDirection * cone.Radius;
    return PointBehindPlane(cone.Tip, plane) && PointBehindPlane(furthestPointOnCircle, plane);
}

bool ConeInFrustum(Cone cone, Frustum frustum, float zNear, float zFar)
{
    Plane nearPlane, farPlane;
    nearPlane.Normal = float3(0, 0, 1);
    nearPlane.DistanceToOrigin = zNear;
    farPlane.Normal = float3(0, 0, -1);
    farPlane.DistanceToOrigin = -zFar;

    bool inside = !(ConeBehindPlane(cone, nearPlane) || ConeBehindPlane(cone, farPlane));
    for(int i = 0; i < 4 && inside; ++i)
    {
        inside = !ConeBehindPlane(cone, frustum.Planes[i]);
    }
    return inside;
}
You see that the results are not so great. For some reason, clusters that are clearly outside the cone, are passing the test? Well, if you think about it and work out the test for each plane, it makes sense. János Turánszki has a great article with a nice drawing of why this happens.
This can be solved by creating an AABB from the frustum and use that as the primitive for testing. However, in tiled lighting, you still want to use frustum culling because in tiles with large depth discontinuities, an AABB will be huge and therefore inaccurate. You want to use a combination of both.
In clustered light culling, just using an AABB works well enough the logarithmic nature of the cluster division on the Z axis causes the clusters to be square-ish and thus doesn’t suffer from these long AABBs in tiled lighting.
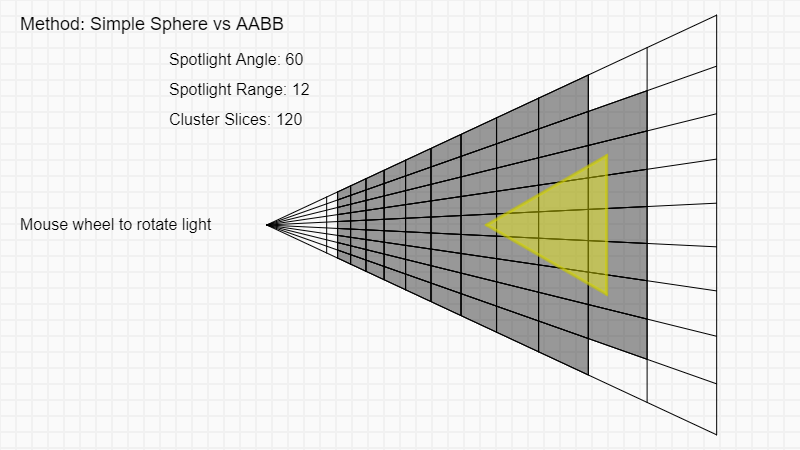
Method 1: Bounding sphere around cone (Simple Sphere/AABB)
This method is probably the first you will go with because it’s easy and thus a good start for testing. By simply using the range and angle of the cone to find the radius of a sphere, a spot light could be treated exactly the same way as a point light, as a sphere. As you might expect, the result is far from good because the bounding sphere is quite awful.
(visualizer replaced by image because screen is too small)
bool SpotlightVsAABB(Spotlight spotlight, AABB aabb)
{
    float3 d = max(0, abs(aabb.center - spotlight.position) - aabb.extents);
    float distSq = dot(d, d);
    float r = spotlight.range / cos(spotlight.angle);
    return distSq <= r * r;
}
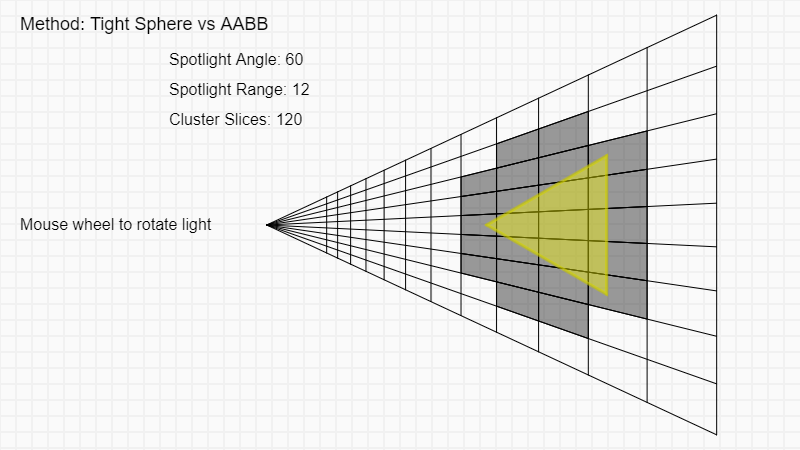
Method 2: Tighter bounding sphere around cone (Tight Sphere/AABB)
The solution above obviously has some serious problems. It really helps visualizing what the shape is and its dimensions when thinking about optimizing. What we’ve created with the method above, is not a great bounding sphere for our spotlight. Treating the cone origin as the center of the sphere is not a good idea. Instead, you split up the bounding sphere calculation in two different cases to create a tighter sphere.
(visualizer replaced by image because screen is too small)
bool SpotlightVsAABB_Tight(Spotlight spotlight, AABB aabb)
{
    float radius;
    if(spotlight.angle > PI_DIV_4)
        radius = spotlight.range * tan(spotlight.angle);
    else
        radius = spotlight.range * 0.5f / pow(cos(light.angle), 2.0f);
    position = spotlight.position + spotlight.direction * radius;
    float3 d = max(0, abs(aabb.center - position) - aabb.extents);
    float distSq = dot(d, d);
    return distSq <= radius * radius;
}
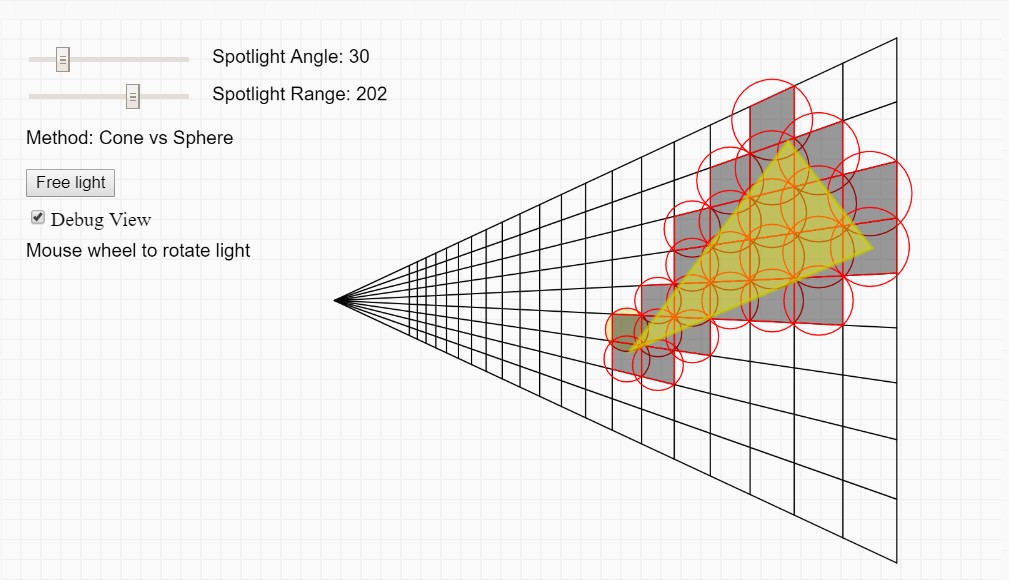
Method 3: Bounding spheres around AABBs (Cone/Sphere)
You have probably noticed the above method still has a lot of false positives when the cone angle gets small or large, this is simply because the constraint is a sphere. After looking for better solutions, I stumbled on this great article: Cull that Cone! by Bart Wronski, he suggests flipping the problem and use a bounding sphere around each of AABBs to do Cone/Sphere testing. Like you can see above, this is an enormous improvement compared to the two other solutions.
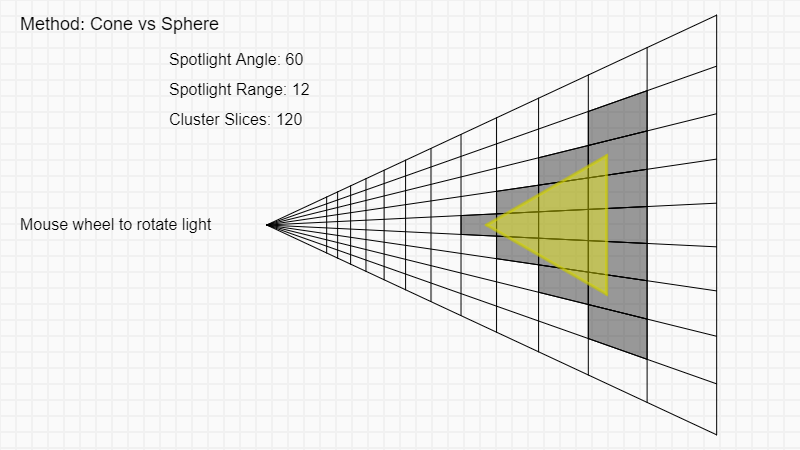
(visualizer replaced by image because screen is too small)
bool SpotlightVsAABB(Spotlight spotlight, AABB aabb)
{
    float sphereRadius = dot(aabb.extents, aabb.extents);
    float3 v = aabb.venter - spotlight.position;
    float lenSq = dot(v, v);
    float v1Len = dot(v, direction);
    float distanceClosestPoint = cos(spotlight.angle) * sqrt(lenSq - v1Len * v1Len) - v1Len * sin(spotlight.angle);
    bool angleCull = distanceClosestPoint > sphereRadius;
    bool frontCull = v1Len > sphereRadius + spotlight.range;
    bool backCull = v1Len < -sphereRadius;
    return !(angleCull || frontCull || backCull);
}
Wrapping up
I’ve found the Cone/Sphere tests were quite successful and solve a lot of problems which the other 2 methods have. The method is more expensive, but it achieves more accurate results. Depending on the properties of the spotlights in the scene, both the last two methods are a good solution. The tight Sphere/AABB method is still great when the angle of the spotlight is around 45 degrees because then the false positives are minimal.
For clustered light culling, the last option is great because we’re dealing with quite square shaped AABBs. However, with tiled light culling having large discontinuities, bounding spheres around AABBs are usually not ideal and therefore it needs to be combined with frustum culling.