Pak files - Virtual file system
Packaging assets in large binary blobs in games is quite common. In 1992, Wolfenstein 3D introduced so called “WAD” files (Stands for “Where’s All the Data?”). This file format has been used after on Doom and eventually pretty much all games currently today in some form. It gives more flexibility to users (and developers) to create patches, mods, it provides opportunities for security measures but more importantly, it improves performance significantly as having only a few large binary files to read from is much faster than reading many small files.
Today, many game engines have adopted the idea of having large files of binary asset data. Unreal Engine uses .pak files, Unity uses .assets files, Anvil uses .forge files, .raf in League of Legends, …
As a small project, I’ve decided to look into creating a similar format. On top of what I’ve described above, the files in a pak file are usually also compressed. This can significantly reduce disk size and possibly even improving performance when disk access is slow and the cost to decompress is low.
The source code of this can be found on my GitHub repository.
Taking a closer look at DOOM1.WAD
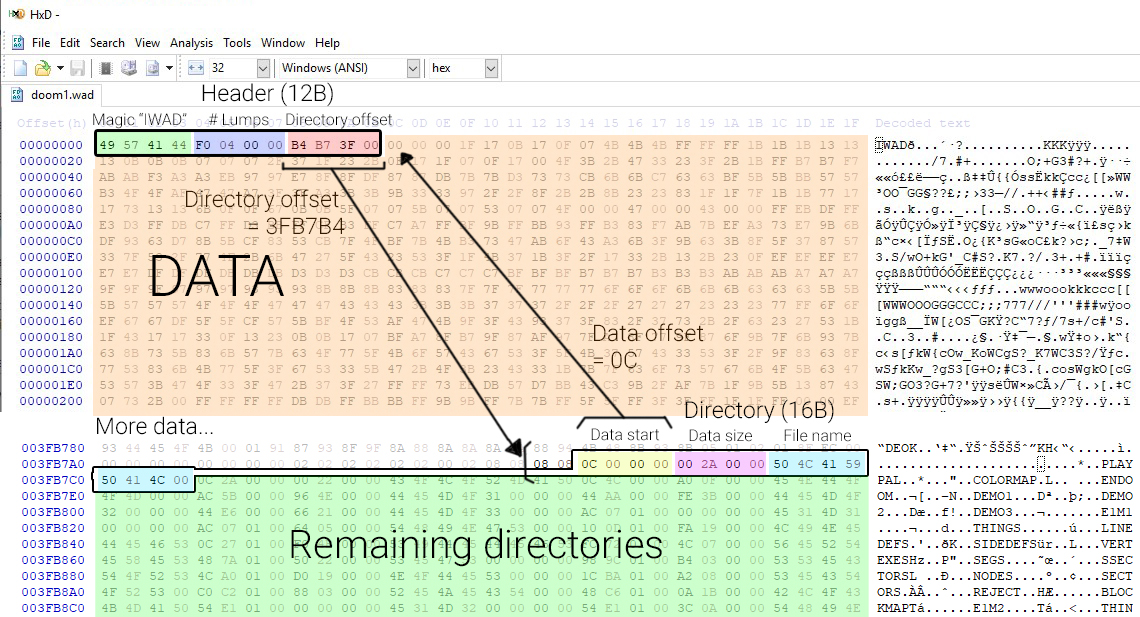
I found it interesting to take a closer look at how data memory in Doom’s WAD files are laid out. You can download DOOM1.WAD for free. This is the asset file used for the shareware version of the game. To open and view this, I’ve used HxD which is a free Hex editor for Windows but any other hex editor will do the job.
According to the Doom Wiki, a WAD file has one file header, multiple “directories” and a large binary blob of data. The file start with a 12 byte header containing a magic value (IWAD or PWAD), the amount of lumps and an offset in bytes from the start of the file to where the directory headers start. Following this directory offset in the hex editor, we hit the first directory entry. A directory is a 16 byte header containing another offset in bytes pointing to where the actual lump’s data is located, the size of the data and the name of the lump.
Looking at HxD, you can quite easily trace this:
The header basically contains a pointer to a sequence of directories at the end of the file and those directories each point to where its data starts in the file. Using this information, you should be able to create a simple program to extract the WAD file. There are many tools that can do this.
Doom implements so called IWAD and PWAD files, the one above is an IWAD file, these get automatically loaded by the game. PWAD files are meant for patches as these can get loaded on top of the game and replace IWAD data.
Pak file implementation
Layout
Looking at how these pak files are implemented in the game engines of today, there are barely any differences to how it worked in Doom. There’s still a file header, multiple directories and a large binary blob. I came up with the following structure that worked for me:
| PAK | ||
|---|---|---|
| Element | Size (Bytes) | Description |
| PakHeader | 159 | File header. One per pak |
| Magic | 4 | “PAK”. To validate file format. |
| Version | 1 | Version of the pak file format |
| Content Version | 4 | Version of the content |
| Folder Path | 100 | Path of the pak file |
| Pak Name | 50 | Name of the pak |
| # Entries | 4 | Number of file entries (used to iterate over all entry headers) |
| PakFileTableEntry | 314 | File entry header. (Count defined in file header) |
| File Path | 255 | File path of the file |
| IsCompressed | 1 | True if data is compressed |
| Uncompressed Size | 4 | Size of the uncompressed data |
| Compressed Size | 4 | Size of uncompressed data (Equal to uncompressed size if not compressed) |
| Offset | 50 | Offset in bytes to point to where the data starts in the data blob |
This translates to the following class layouts:
struct PakHeader
{
    char ID[4] = { "PAK" };         //Used to quickly verify file format
    char PakVersion = 0;            //The version of the format. This should match with the code that parses it
    int32 ContentVersion = 0;       //The version of the content. Used to possibly do patches and updates to files
    char FolderPath[100];           //The path to the original folder
    char PakName[50];               //The name of the pak file
    uint32 NumEntries = 0;          //The number of directories/files
};

struct PakFileTableEntry
{
    char FilePath[255];             //The path to the file (relative to the pak directory)
    bool Compressed = false;        //True if compressed
    uint32 UncompressedSize = 0;    //Size before compression
    uint32 CompressedSize = 0;      //Size after compression
    uint32 Offset = 0;              //Offset pointing to start of binary data
};
While working on this, I’ve wondered why many pak file formats store their file headers (aka directories) at the end of the file. I’m not entirely sure why but the main reason I can think of is because you need to know the result of the data compression before you can write the file headers. If you want to write your file headers first, you have to keep all data in memory and wait until the end of the process to dump it all. For large pak files, you might run out of memory. If the data is written immediately to the file, it doesn’t have to be stored in memory. This might be an interesting thing to research at some point.
Paking and compression
Once you get the idea of a pak file, actually implementing it is fairly easy. You grab a list of files you want to pak, load them into memory one by one, potentially compress them and write it to a file. Besides that, store the file information and data offset in the file header.
//Create the header
PakHeader header = {};
header.NumEntries = 0;
header.PakVersion = (char)PAK_FILE_VERSION;
header.ContentVersion = contentVersion;

while (std::getline(responseFileStream, filePath))
{
    std::ifstream fileStream(filePath, std::ios::ate | std::ios::binary);
    assert(!fileStream.fail());

    //Create the file entry
    PakFileTableEntry pakFileEntry = {};
    pakFileEntry.UncompressedSize = (unsigned int)fileStream.tellg();
    pakFileEntry.Offset = (unsigned int)dataBuffer.size();
    pakFileEntry.Compressed = (pakFileEntry.UncompressedSize > (unsigned int)compressBias && compress == true);
    fileStream.seekg(0);

    //Read the file into memory
    std::vector<char> fileData;
    fileData.resize(pakFileEntry.UncompressedSize);
    fileStream.read(fileData.data(), pakFileEntry.UncompressedSize);

    //Compress the data
    if (pakFileEntry.Compressed)
    {
        std::vector<char> compressedData;
        bool result = CompressLZ4(fileData.data(), fileData.size(), hq, compressedData);
        if (result == false)
            return result;
        pakFileEntry.CompressedSize = (uint32)compressedData.size();
        dataBuffer.insert(dataBuffer.end(), compressedData.data(), compressedData.data() + compressedData.size());
    }
    else
    {
        pakFileEntry.CompressedSize = pakFileEntry.UncompressedSize;
        dataBuffer.insert(dataBuffer.end(), fileData.begin(), fileData.end());
    }
    //Add the entry and close the file stream
    fileEntries.push_back(pakFileEntry);
    fileStream.close();
}
Usually, when creating a pak file, you get the option to compress the data. This compression is always done per file, the data is never compressed in its whole. Even though this could improve compression ratio, it would not make sense because you’d have to load the entire data blob and uncompress it even if you just want to read a few files. Compression can be done with any library however some libraries are built more for fast decompression which is what we want in realtime applications. I choose to use L4Z but others like zlib (used in UE4) and Oodle are also commonly used. Some files like config files are very small and don’t benefit from compression because the compressed result could be larger. I just came up with a threshold (0.5MB) that defines from what size a file should get compressed.
There’s another interesting benefit from using pak files, that is security. Having a custom format rather than a commonly used and known format already provides a small layer of security that stops normal people from tampering with your data however, this is extremely easy to work around using a hex editor to reverse-engineer it. An obvious solution is to encrypt all the data but this has a huge performance problem, however there is a middle ground here. The data in a pak file is just a blob of bytes that are impossible to interpret without the file headers, especially when the data blobs are compressed. So instead of encrypting the data, encrypting the file headers is a much better and faster method to secure your data. This can easily be achieved. Besides encryption, the data can have checksums that can be verified and checked for tampering.
Reading and decompression
Reading pak files is pretty much as simple as writing them however going for a naïve approach will limit the flexibility of using pak files combined with regular physical files. At the base of this lies a virtual file system. There are loads of code repositories that all implement this differently, I simply went my own way without looking too much at what’s already out there. A virtual file system (aka VFS), allows you to treat all files as if they were just physical files. This not only works with pak files, it can work with any archived file or even files on a network or server. The idea is that every type of data implements the same filesystem interface so that all files can be treated the same. This is especially important during development because you wouldn’t want to be needing to create a pak file each time you modify an asset. The VFS works by “mounting” certain directories or archives to a virtual file path. That way, the system can pretend that for example the files of my pak file at C:\Games\MyGame\Resources\MyPak.pak are in Resources\ and I can address the files in the pak files as if they were just physical files.
I created two interfaces: IMountPoint and IFile. A mountpoint is basically the directory or archive that will get attached to the VFS. Each type of input implements how the file or directory should be treated. For a regular file directory, this is fairly simple. A PhysicalMountPoint simply reads the contents of the whole directory and stores in a list so that the VFS can later access and search it. File implements how a single file entry should be interpreted. Again for a regular file, this is just reading the file like you normally do, that is what the PhysicalFile does.
class IMountPoint
{
public:
	IMountPoint(const std::string& physicalPath, const int order = INT_MAX);
	virtual ~IMountPoint() = default;
	virtual bool OnMount() = 0;
	virtual std::unique_ptr<File> GetFile(const std::string& filePath) = 0;
	virtual bool HasFile(const std::string& filePath) const = 0;
};
class File : public IOStream
{
public:
    explicit File(const std::string& fileName);
    virtual ~File() = default;

    virtual bool OpenRead(bool allowWrite = false) = 0;
    virtual bool OpenWrite(bool append = false, bool allowRead = false) = 0;

    bool virtual Flush() = 0;
    virtual bool Close() = 0;
    virtual bool IsOpen() const = 0;

    bool Exists() const;
    std::string GetDirectoryPath() const;
    std::string GetFileName() const;
};
A MountPoint can be given an “order”. This idea gives me the ability to prioritize certain folders or pak files in order to support patching or modding. Simply giving a certain pak file a higher order, will make the VFS choose the file with the highest order first. When accessing a file, the VFS will search the mountpoints in descending order.
Using the same interfaces, I implemented the PakMountPoint and PakFile. They both implement the same functionality. The PakMountPoint actually uses a PhysicalFile to read the file headers of the pak file and store a list of files similar to the PhysicalMountPoint together with the data offset information in order to be able to access the data of each file.
bool PakMountPoint::OnMount()
{
	//A pak file is a regular file so load that first
	m_pPakFile = std::make_unique<PhysicalFile>(m_PhysicalPath);
	if (!m_pPakFile->OpenRead())
		return false;

	//Read in the header
	if (!m_pPakFile->ReadFrom(reinterpret_cast<char*>(&m_Header), 0, sizeof(PakFileHeader)))
		return false;
	if (strcmp("PAK", m_Header.ID) != 0)
		return false;
	if (m_Header.Version != PAK_VERSION)
		return false;
	m_Order = m_Header.ContentVersion;

	//Read in all the table entries
	m_FileEntries.resize(m_Header.NumEntries);
	if (!m_pPakFile->ReadFrom(reinterpret_cast<char*>(m_FileEntries.data()), sizeof(PakFileHeader), m_Header.NumEntries * sizeof(PakFileEntry)))
		return false;
	return true;
}
The PakFile uses the info in the mountpoint to fetch the right part of the data blob and is able to uncompress the data if required. I’ve realized that the name PakFile in my implementation is quite ambiguous as it represents a single file inside a pak file and not the pak file itself.
size_t PakFile::Read(void* pBuffer, const size_t size)
{
    const PakMountPoint* pMountPoint = static_cast<const PakMountPoint*>(m_pMountPoint);
    int sizeToRead = m_FilePointer + size > m_pTableEntry->UncompressedSize ? m_pTableEntry->UncompressedSize - (unsigned int)m_FilePointer : (unsigned int)size;
    size_t read;
    if (m_pTableEntry->Compressed)
    {
        //If the file is compressed we have to cache the uncompressed data if we want to use it later
        if (!CacheUncompressedData())
            return 0;
        memcpy(pBuffer, m_UncompressedCache.data() + m_FilePointer, sizeToRead);
        read = (size_t)sizeToRead;
    }
    else
    {
        read = pMountPoint->GetPakFile()->ReadFrom(pBuffer, m_pTableEntry->Offset + m_FilePointer, (size_t)sizeToRead);
    }
    m_FilePointer += read;
    return read;
}
Writing to a PakFile is not implemented as it doesn’t really make sense to do that.
With this interface in place, supporting other archived types is very easy. I’ve also implemented support for zip files by creating a ZipMountPoint and ZipFile.